The Facebook pixel is properly installed without any technical issues.
Prerequisites or Requirements
Lorem ipsum dolor sit amet, consectetur adipiscing elit. Ut elit tellus, luctus nec ullamcorper mattis, pulvinar dapibus leo.
Why Facebook Pixel is Important
Facebook Pixel is essential if you want to use Facebook advertising. With this pixel, you can create remarketing audiences and set up conversions for your campaigns.
Note: If you are using Shopify do not follow this guide, but instead follow Guide How to add a Facebook Pixel to a Shopify Store.
Where this is Done
In Google Tag Manager and your Facebook Ads manager.
When this is Done
Only once—the first time you install the Facebook pixel.
Who Does this
The person responsible for website management, analytics, or paid advertising.
Environment Setup
Important:
This guide describes the process of installing the Facebook Pixel using Google Tag Manager (the tool we recommend for adding and managing tracking codes to your website.) If you haven’t added Google Tag Manager to your site, you can check out our Google Tag Manager Installation guides for WordPress or Squarespace.
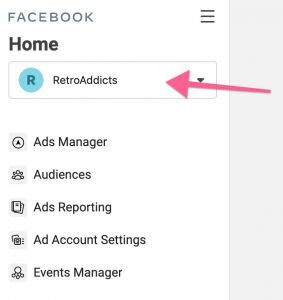
3. Make sure to select the right Business Manager account from the dropdown:
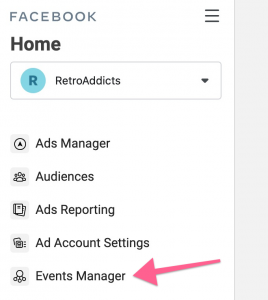
4. Next, click on “Events Manager”
5. If a Pixel has already been created but hasn’t been installed yet, select it from the list on the left and click “Continue Pixel Setup”(then follow jump to step 7)
6. If this is the first time creating a Pixel for this business:
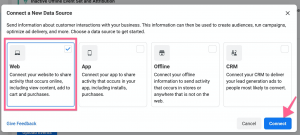
a. Click on “Connect Data Sources”
b. Select “Web” from the list, and click “Connect”
7. Select “Facebook Pixel” from the list, and click “Connect”
8. Give the Pixel a name and provide the website’s URL
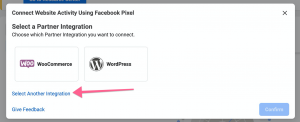
9. You will be presented with a few options to install your pixel on WordPress. If Google Tag Manager is’t listed, click on the “Select Another Integration” option
10. Select “Google Tag Manager” from the list
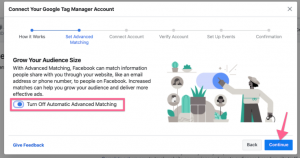
11. You will be asked If you want to turn on “Advanced Matching”. If you are an advanced Google Tag Manager user you might want to configure it now. If not, leave it “Off” and click “Continue”:
12. Next, you will be prompted to sign in to the Google Account you use for Google Tag Manager and will need to allow Facebook to make changes.
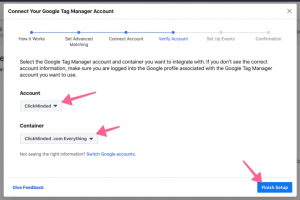
13. Back in the Facebook Ads Manager interface, pick the Google Tag Manager account and container you would like to use, then click “Finish Setup”
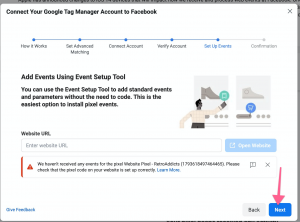
14. Next, you can choose to add events using the Event Setup Tool. Since you just want to add the Pixel Base Code, for now, you will just need to click “Next”.
a. You might see a warning that mentions that the pixel hasn’t received any events. This is normal since you’ve just installed it-we’ll verify the installation later in this SOP.
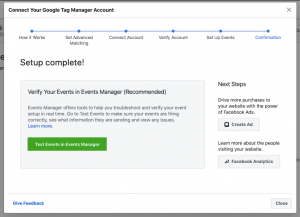
15. Finally, you’ll see a screen confirming that the setup is complete.
3. You should be able to see your Facebook Pixel installed. The extension should be able to find at least one pixel, and it should match the Pixel ID on your Facebook Business Manager.